Masonic Apron Restoration and Repair
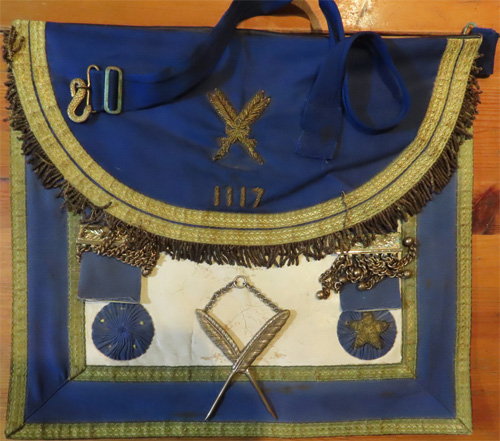
Masonic Apron before restoration
The Secretary's Apron, like myself, has seen better days and so we decided to carry out a light restoration; as opposed to "buying new" or repairs with replacement parts. I should add that the cleaning of the Office Jewel using just silver polish, and accompanying sash in lukewarm wash and careful pressing thereafter, presented little difficulty. The Apron on the other hand was somewhat more involved.
Please note that I am a complete amateur when it comes to restoration, so the following are just what I did to make an old Apron look better. If you wish to try the same procedures, you do so entirely at your own risk.
Here are the terms we will reference in the procedures:-
APRON NOMENCLATURE
Flap: the top part of the apron which is folded over. It can be in the form of a semi-circle or triangle.
The Square : the main or white part of the apron, made from Lambskin leather or nowadays it can be vinyl.
Belt and snake: The part that holds the apron to your body around the waist. The snake is the metal clasp to fix the belt in place.
Apron Chain Tassels: Ornate metalwork comprised of capital bar, chains and balls mounted on the square of the apron.
Taus: Decorative brass symbol in the form of the greek letter T (Hebrew Taw)
Emblems : Can be just rosettes or embellished with other ornaments, such as a "gold" five-pointed star.
The colour of the blue on the apron/ribbon is Navy Blue #000080 or veering to Royal Blue (Dark) #002366. Note English aprons are of a lighter, Cambridge Blue?
RESEARCH
Sourcing Masonic specific spare parts is difficult, however not impossible if you wish to go down this route (see below). Be aware that your restoration and spanking new tassels, may look slightly at odds with each other.
I also contacted a reputable Dry Cleaner in Inverness with previous experience of Masonic Aprons and they said that such items were not really designed to be cleaned. The process would probably damage the apron AND the dry cleaning machine. The products I finally chose for the restoration were also carefully researched but you may find newer or better methods and materials. (see below for materials list & source).
PREP'
First, I checked for loose bits which included the belt which due to its maximum girth being less than mine, had parted company with the Apron.
Some of the gold wire tassle braid also fell off and had unwound. A few of the gold balls were missing as was one of the rosettes; namely the "5 point star emblem".
I then gave the whole apron and parts going over with a car vacuum cleaner, to remove grit and grime. This done I used some masking tape to cover the entire apron, flattened it, so it stuck well, and then removed it again. This lifted more of the dust and dirt as it stuck to the tape. I found that good masking tape was by far, the most useful tool in the whole restoration.
Cleaning the leather to a spotless whiteness is difficult, but general grime can be removed by wetting the leather and then gently cleaning with a clean cloth dipped into a lukewarm weak solution of fairy liquid. Then removing any trace of detergent with a clean damp cloth.
The waistband and snake buckle were cleaned in a similar manner using the tack method on the material, and very, very dilute washing up liquid on the "gold" parts. A cheap Braun Electric Toothbrush and old brushes were ideal. A lukewarm wash in soapy water can also be done, then left to air dry. Once the ribbon (belt) is dry, it can be flattened inside some baking parchment using an iron on low. The parchment allows for gentle pressure and prevents and contamination of either iron or belt.
CLEANING BRASS
The fittings or ornaments of the apron were cleaned then some of the tarnished removed.This can be done chemically using an all-in-one polish or in two stages using a chemical tarnish remover then brass polish. I used an all-in-one, older product which is called Astonish Silver Cleaner, then removed the polish to a shine with a microfibre cloth. Brasso is also good and easily available, once the tarnish is removed.
The brass/gold coloured parts are best cleaned after removal from the apron. However if this is difficult they will need to be cleaned in-situ. I chose this approach for some parts of the apron and so carefully masked surrounding areas with masking tape, to prevent the cleaning materials from bleaching or damaging leather or fabric. Spatter is an issue if using an electric toothbrush to polish and clean. An ordinary toothbrush is more forgiving. Once cleaned, the brass shows its colour. Brass balls at the end of the Apron Chain Tassles, can be sourced on jewellers websites under findings to replace missing balls and chain and affixed to the tassle(s). Note: I also used 000 Steel Wool on the oxidation, "green stuff", to good effect.
LEATHER
I should say that the condition of my apron was borderline-repairable and so rather than carefully restore the leather (the white part may be vinyl) was painted with a proprietary White Leather Paint. I used a product called : Angelus WHITE Acrylic Leather Paint, which has a good reputation and relatively inexpensive. You can also use the paint on vinyl.
First mask the apron well so that any spatter will land on masking tape and not your apron. I used two coats and a 1cm flat brush. You may want to use a smaller pointed brush for "cutting in". Start in an area where no one will see the paint (under the flap), so you get a feel for the paint and the brushes. The Angelus Leather paint (see below) is water soluble so brush cleaning should be done as soon as you finish painting. In a warm room the paint should be "dust safe" in around 15-30 minutes. Apply coat number two the following day, further coats if required at the same interval. When doing the actual painting; TAKE YOUR TIME! and do it undisturbed by pets or family.
GOLD
Once tarnished, gold braid and trim is very difficult to clean. I again used the tack method of sticky tape to remove dust and grime. The results were poor as the braid and trim had bothe deteriorated significantly. I therefore resorted to painting them with DecoArt gold paint. While this is not the ideal solution, it turned out to be reasonably effective. With proper masking and two coats, an acceptable result may be achieved. Again patience and a small brush is key! For the wire fringe on the Apron Flap masking is crtical as is the protection of any exposed apron surfaces. I used a large polythene bag with the Apron in the bag and the flap outside. The fringe was tacked to remove "rust" with sticky tape and any loose wire removed. This process helped straighten and align the fringe. The technique of painting wire fringe, is more laying on of paint than brushing. Each twisted wire strand is treated separately and a line of paint laid on one side. On the second coat the opposite side of each wire is treated similarly and any gaps in the paint were filled.
REPAIRS
The belt had come away from the apron. This required the picking apart of the layers of apron where the belt meets the apron. I used an awl (sharpened nail and gaffer tape) to create new holes. A large-ish leather needle and waxed thread were used for the stitching, which took the form of a square and two diagonals bisecting same.
Contact adhesive was then used to re-join the layers. Typically restoration has to be reversable. However in this instance, Evostick isn't difficult to open up again. PVA and clamps may be an alternative.
The gold coloured, five pointed star emblem was missing from one side of the apron, but fortunately the other remained. This was the template for the replacement. I used "DAS" which is a cold curing clay. It is easy to work with. First I covered the remaining star emblem in clingfilm. Then rolled out a small sphere of DAS clay to the required thickness of the "star". Placing the clay "button" on top of the clingfilmed star, steady downward pressure was used to get an imprint on the clay. The imprinted clay removed, the reverse of the button was pushed forward so it became convex rather than a concave imprint. This was repeated a few more times so there were "spares" to work with. The imprinted buttons were trimmed to their correct size and left to dry for 4 days, turing each day. DAS behaves very well and there wasnt any noticable shrinkage. When dry, the visible side was painted with gold pain, with around 2mm paint extended underneath. Blu Tack is useful to raise and hold it to a surface whilst painting. Repeat painting until satisfied with the result. The gold star was then fixed to the apron using Impact Adhesive although Gorilla Glue would have been used if I had some to hand.
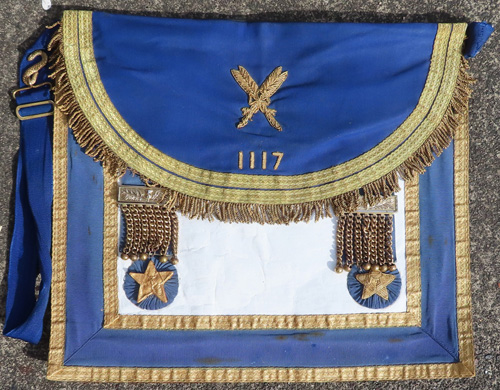
Masonic Apron after a light restoration
AFTERCARE
Using wax nourishes the leather and is good for maintenance.
However if you are doing a restoration, I believe the wax would come last, as the wax seals in any existing grime or crease damage, and prevents deep cleaning.
After a long and painful restoration, I believe the best course of action is to store and maintain the apron with wax (and polish for the metals) from day one. In other words, don’t let the apron get into a deteriorated state in the first place.
Regalia cases are a good way of keeping the colours bright and the metals less oxidised and of course .. no dust. SO while it may look nice to have the aprons and jewels left out on the respective Office Bearers' stations; between Meetings the regalia may be better served by being placed in a case.
EPILOGUE
Now that you have restored your apron, allow me to direct your attention to Etsy.com where you can obtain a brand new apron for 35 pounds ...! Not great quality .. but now you are a master restoring mason... these aprons could be a good starting point for another project.
Similarly you can find all the apron accessories on Ebay by searching any of the following keywords:
Masonic Regalia Apron Accessories T Bars Tassels Rosettes Belt.
Prices from 2.99 pounds for 1 tassels (5.98 Pounds the pair)
PURCHASES, ON-LINE RESOURCES
Pricing in GBP and approximate at APRIL 2023- Affiliate links.
TESCO
Metal Polish : Brasso wadding / Duraglit 3.50
Multi Purpose Needles 1.60
Microfibre Cloths 1.50
AMAZON
Masking Tape : 2.00
Gold Painting : DecoArt 6.88
Leather Painting : Angelus White Acrylic Leather Paint 6.67
DAS 500g : 6.15
Evostick Contact Adhesive: 5.18
Leather repair kit : 4.99
Steel wool 0000 grade 3.27
Acrylic Paints
Hot Melt Glue Gun
EBAY / ETSY etc
Click here for apron furniture sources
NOTE: All the above items can be used for around 3 aprons or more (if paint is used sparingly). Things like rubber gloves, glue, toothbrush, Brillo pad, cloths, detergent, needle and thread and sticky tape are readily found around most homes. Metal polish can be made with vinegar, salt and flour. Just mix the ingredients into a paste. It's messy and stinks though.
You can also make your own DAS facsimile using : cooking oil, cornflour and Bicarbonate of Soda. Just "Google" Homemade Air Dry Clay.
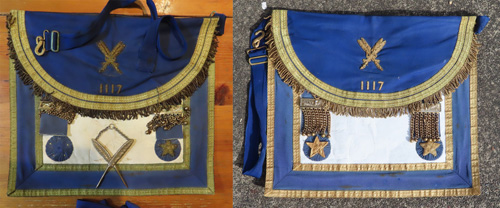
Side by side comparison.